

Ok kids, let’s go!
Just go to Spatula City
S P A T U L A C I T Y
Buy 10 spatulas and get one FREE!!
Who needs glue, if you’re hellbent on keeping it, stick the plastic back in and figure out a good place to put a screw/nail through and file it down if it goes out the other end.
If it breaks again you’ll most likely be forced to completely replace it though, which is a good thing as it will mean didn’t deserve the second life you’ve given it.
Can I introduce you to hand crafted spoons and spatulas:

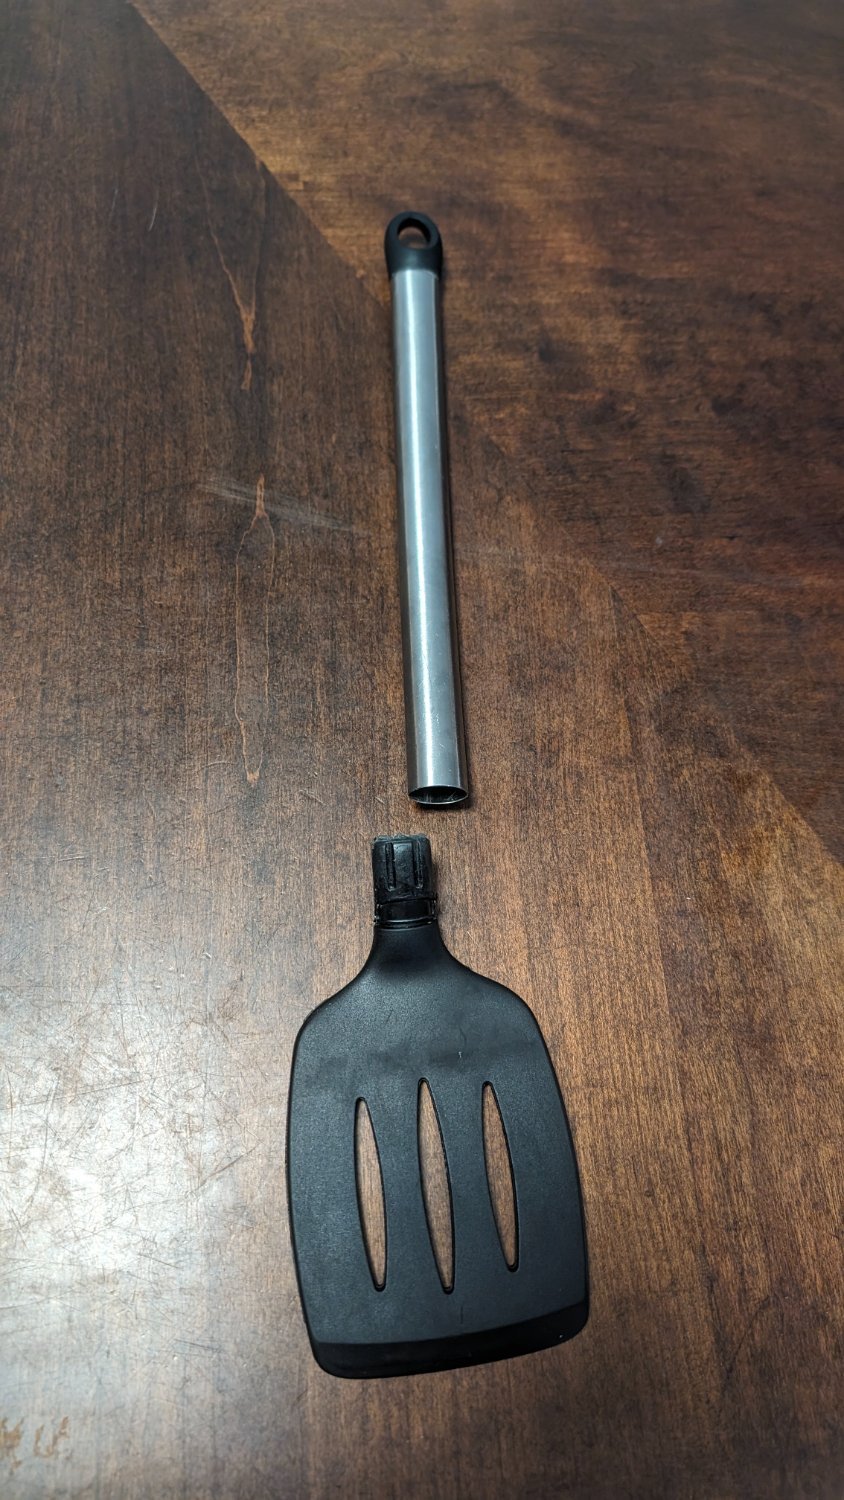
That middle one acting kinda sus ngl
The butt plugtula
I don’t think these would be happy in a dishwasher
I wash all my wooden stuff in the dishwasher. It’s not ideal but it’s not like they fall apart after the first wash.
I have wooden spatulas that are years old that have always been machine washed.
Not that much of a problem, and even less so if you use bamboo utensils.
Really? I can believe I was misinformed/taught wrong, but can you back that up? Online results are split.
Dope. Etsy link?
My brother makes them and sells a few, but considering that we are on the other side of the world to most people postage is a killer.
He doesn’t have a ‘store’, although I did put one together for him during lockdown, but you could contact him through insta Wooden Jeff
God this gives me PTSD of the similar spatulas my grandparents insist on getting for some reason XD a big reason I don’t skimp on quality kitchen supplies now. I recommend, if it’s available, anyone who wants good kitchen stuff that won’t break easy, try finding an Asian market of some kind with an appliance etc. section. The Korean market near me sells all type of great wooden spatulas, tongs, etc. and also stainless steel, for a great price. Way better than the overpriced trash at the big box stores.
Any glue that is a) food safe and b) able to be stuffed in a dishwasher is probably going to be more expensive than a new spatula.
I applaud the effort to repair, but sometimes, it’s just not viable. Especially because the problem is in the relatively weak design of the part.
Drill a hole through both and put a bolt/nut
That’s going to cause some sanitary issues…
Nah not really, most cheap pots and pans are bolted to their handles anyways.
Looks like someone needs a trip to SPATULA CITY!!! https://youtu.be/4BUDwj_mXKE
Assuming it’s a press-fit…
I would do what another user suggested and use a bit of food grade silicone. Put it around the insert part and push on the handle. Then, take a flathead screwdriver and a hammer to put a little indent where that well is on the top of the spatula part, just under the edge of the metal.
If I really wanted to keep it I wouldn’t use glue I’d put part of a balloon or a finger from a glove on the spatula and force it back in. IMO any kitchen utensil that’s 2 parts like this will always fail quickly. I believe that’s a force fitting with ridges intended to keep it in so slightly enlarging the piece that goes in will recreate the tight fit
I’ve used tin foil to make the same repair. You can be as sloppy as you like, after it fits snuggly, you can just peel/rub off any excess.
Water proof JB Weld. But honestly it should be tossed. You want a spatula with a full tang. Even after you JB weld this the metal is going to fatigue and it will break again because there is so little connection between the tool and handle.
Yeah, I threw it out. I’m gonna order a full stainless steel one.
JB weld only does metal to metal right?
There’s different types of JB weld that will do different materials.
JB weld does pretty much anything to anything.
If I wasn’t going to throw it away, I’d probably fill the handle completely with food grade silicone caulk and score the s*** out of the plastic plug before I forced it together.
But unless I had a damn good use for the rest of the tube of caulk there’s no good reason to burn a $10 tube of caulk for a $2 spatula.
Certain tree based resins are actually used in cooking.
Pick one of those edible ones and reapply them every time this comes off.
There will be minute amount of gum going into your food, but it will still be food.On the downside, those gums are easily water soluble, so depending on you long and hot you wash (and how tight the handle seals), you might see it coming off each and every wash. You won’t have it coming off while cooking though (as long as you keep the junction out of water.
Just get a Spurtle.

West Systems 105 epoxy and 205 fast hardener. Roughen the area with some 220 grit sand paper, blot on some epoxy with a chip brush, wrap in fiberglass. Repeat until you have 2-4 layers of fiberglass. Use epoxy with 406 high-density filler to blend the edges if desired. Vacuum bag it until the epoxy has cured. Wet sand smooth if necessary, working up to 4000 grit.
Sir, this is a dollar spatula.
The glue would cost the same price as a spatula at a dollar store.


